
Autopilot
Automated Trading
Introduction
It’s long been said, “Where Systems Fail, Methods prevail.” This phrase has long been the standing order of business here at Gecko Software, so why now would we change our thoughts on this matter, and come out with a System Execution Autopilot Package?
Very simply put, our Autopilot is more than just a simple trading system, it was developed with the individual trader in mind, and with the mindset that trading methods are more powerful and more profitable that trading systems alone.
Traditionally speaking, a trading system has been a mechanically computerized method of buying and selling each time you receive a signal from an indicator. Most “systems” are designed around a traditional indicator, and are as simple as buying each time you receive a buy signal, and selling each time you receive a sell signal. This style of system trading has, in the past, proven to be the downfall of many otherwise would-be successful traders. Simply jumping into a market each time you get a buy signal and jumping back out each time you get a sell signal is a sure fire way of giving up your holdings to someone else.
It is for this purpose that we here at Gecko Software have created the Autopilot system trading platform in such a fashion that we integrate the advantages of system trading, with the advantages of method trading, allowing the Track ‘n Trade Autopilot to automatically execute your own personal trading methodology, not just a simple trading system.
Preferences
Select the Autopilot tab in the Control Panel (the tab has a head as the icon).
1. System Setup: Save your own trading strategies here so you can use them in the future. Use the pull down box to find previously saved strategies. Use the New start a new strategy. Use the Save button when you want to save a strategy that you don't want to lose. Use Del. button to delete your strategy. (More Info)
Note: It is strongly encouraged that the trader also keep a hardcopy of their Autopilot settings.
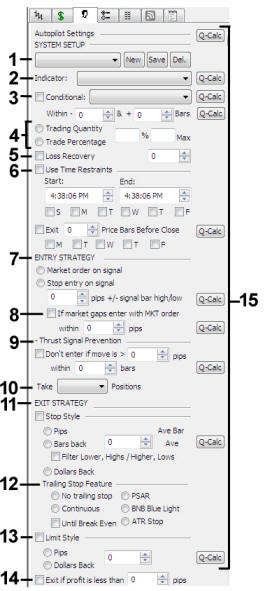 2. Indicator: Choose which indicator or system you would like to use.
The indicator must have buy/sell signals notified by arrows. (More Info)
2. Indicator: Choose which indicator or system you would like to use.
The indicator must have buy/sell signals notified by arrows. (More Info)
3. Conditional: Add a conditional indicator or system here. If your conditional indicator puts up a buy/sell arrow in the same direction as the primary indicator, and those two arrows fall within the margin of error listed in the (+) Plus or (-) Minus boxes, then Track ‘n Trade will execute a position. If the two indicators are not in agreement, by the margin of error, then no position will be executed.
4. Trading Quantity & Percentage: Number of units you’d like the trade to place or Percentage of your account you’d like to trade when the trade is placed with max number of contracts to allow. (More Info)
5. Loss Recovery: Enabling the Loss Recovery feature tells the Autopilot to try and recoup your full loss in the next trade by increasing the number of contracts you were trading. If/When it hits your take profit (limit order) your losses should be recovered. The number next to it is a way to spread out your Loss Recovery over more than one trade, then the Autopilot will automatically shift the number of contracts to spread over the number of trades you choose. If you do not have enough margin to cover the extra contracts being traded then the Autopilot will ignore it all together. (More Info)
6. Use Time Restraints:
Start time – When the Autopilot will start looking for
buy/sell signals to place trades.
End time – When the Autopilot will stop trading for the
day.
Days of the week – Which days of the week the
Autopilot will trade. (More Info)
7. Entry Strategy: Market order on Signal – Click button to
place a market entry order immediately on a buy/sell signal or
confirming conditional signal.
Stop entry on Signal – This option will place a buy stop or sell
stop entry order into the market at a predefined number of points (Futures) or
pips (Forex) above or below the high or low of the price bar in which the signal arrow is
pointing at. (More Info)
8. Market Gap MKT Order: If selected, you can specify number of points/pips to allow for slippage if the market gaps above the original entry order. (This features was placed in the Autopilot because if the market gaps above where the software was going to place an order the trade would have been deemed invalid and thus rejected by the broker).
9. Thrust Signal Prevention: If selected, you can specify how high, or low you are willing to allow the market to move during any single timeframe and within a specified number of price bars before allowing the Autopilot to place an entry order. This is used to prevent a fake out “thrust” from a highly volatile move from something like a news announcement. (More Info)
10. Take Positions: Choose if you want the Autopilot take Long positions, Short positions, or Both positions. (More Info)
11. Exit Strategy: Choose what style of stop you want to
place and where to place it. Choose from Pips/Points, Bars Back, or Dollars
Back.
Ave Bar – shows the average price bar height in pips/points. (More
Info)
12. Trailing Stop Features: Choose what kind of stop you’d like to place.
Continuous, PSAR, BNB Blue Light, ATR Stop or No trailing stop.
Until Break Even - If you select Until Break Even, Track ‘n
Trade will automatically trail your stop loss order based on the entry
amount listed in the previous section, until it reaches the price level
of your entry order; upon reaching the same price point as your entry
order, Track ‘n Trade will stop the automatic trailing of your stop
order, and leave it active at the break-even price level. (More
Info)
13. Limit Style: Number of pips for limit (points for Futures). (More Info)
14. Exit If Profit is Less Than: Exit your position if your profit is less than whatever number of pips you set. (More Info)
15. Quick Calculation (Q-Calc): The Q-Calc buttons are used to optimize the best settings for each setting on the Autopilot Control Panel. For an in depth description on how to use these buttons, please visit this part of the manual.
Start Trading
After you have set your preferences find the green Start Trading button near the top of the Accounting Window in the upper left corner. This will begin Autopilot trading. Trades will be placed based on the preferences you chose, and the buy/sell signals of whatever indicator you are using.
![]()
Once the Start Trading button has been selected it will change to a Stop Trading button that can be used to stop your trading through the Autopilot any time you want.
![]()
Note: When the Start Trading button has been clicked the Autopilot options will be grayed out and you will not be able to change them unless you select the Stop Trading button.
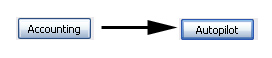
Toggle Autopilot Options
In the lower left corner is where the controls are located for the accounting portion of Track ‘n Trade. The Autopilot button is a two-state button that controls which “view” you are looking at. If you press the Autopilot button, you’ll notice that it switches the screen to reveal the autopilot performance analysis screens. Also note that the button now says, "Accounting." If you click the same button again, it flips you back over, revealing the current markets accounting information.
For training videos visit the Track 'n Trade Education Center